forwarders {10.168.20.233;};Restart the bind daemon and off you go.
forward only;
Note that since we are actually forwarding name queries, there is no need to modify the /var/named/named.ca file, like I had to do in the previous post.
forwarders {10.168.20.233;};Restart the bind daemon and off you go.
forward only;
M.ROOT-SERVERS.NET. 3600000 IN A 10.168.20.233I think I might be getting a little bit ahead of myself. Let's start from the beginning and install Bind:
yum install bind -yYou'll now need to edit the bind configuration file /etc/named.conf and make a few changes:
listen-on port 53 { any; };Given the fact that I had not configured DNSSec properly I also commented the dnssec lines out.
allow-query { any; };
/* dnssec-enable yes;Ensure that the Bind daemon is set to run at boot time:
dnssec-validation yes;
dnssec-lookaside auto;
*/
chkconfig named onOpen up the firewall and save the changes:
iptables -I INPUT -p udp --dport 53 -j ACCEPT; iptables -I INPUT -p tcp --dport 53 -j ACCEPT;service iptables saveYou can now start named:
service named startThe best way to test this is to use dig and look at the times it takes to run a query. In my case, I can just turn off the master dns server and if the results are cached, then I will get a response, e.g.:
dig myserver.domain.com
;; Query time: 2 msec
;; SERVER: 10.168.20.234#53(10.168.20.234)
dig myserver.domain.comThis feels a little bit unsatisfying, so I used the tc command to add a 200 milisecond delay to all traffic on eth0 (note that this is done in the master dns server)
;; Query time: 0 msec
;; SERVER: 10.168.20.234#53(10.168.20.234)
tc qdisc add dev eth0 root netem delay 200msI bounced the caching server and tried again with dig:
dig myserver.domain.com
;; Query time: 202 msec
;; SERVER: 10.168.20.234#53(10.168.20.234)
dig myserver.domain.comA lot better this time :). It now makes a bit more sense to have a caching name server.
;; Query time: 0 msec
;; SERVER: 10.168.20.234#53(10.168.20.234)
dnssec-keygen -a RSASHA1 -b 1024 -n ZONE domainThis was the result, for a while
Generating key pair.It seemed to hang there. The problem turns out to be a lack of entropy, which can be checked with this:
cat /proc/sys/kernel/random/entropy_availIt turns out that this is not good enough to generate a key, so the standard advice is to try to compile a kernel or generate some I/O work. Compiling a kernel was really not an option, so I tried to generate some I/O work but to no avail. After a googling for a bit I came across the rng daemon, which will generate a bit of entropy for you.
73
rngd -r /dev/urandom -o /dev/random -bNow entropy in the system is:
cat /proc/sys/kernel/random/entropy_availWhich is enough to generate the key. Note that /dev/urandom is not truly random, as it will use SHA1 to generate random data when the entropy pool has been depleted, see this for a better explanation. However, this is good enough for my test system.
3968
#!/bin/bashIf you move/copy the script from a different directory or you use a different directory, the SELinux context is likely to be wrong and will need to be changed, so bear that in mind.
echo "Content-type: text/html"
echo ""
echo "Uptime is: $(uptime)"
chmod +x uptime.cgiYou can now test your new cgi script with:
elinks 127.0.0.1/cgi-bin/uptime.cgiYou might want to add the following directives to a different directory to enable script execution and allow other script extensions.
Directory Options +ExecCGINote that the . before the file extension is not needed and that the extensions are case insensitive.
AddHandler cgi-script pl cgi
UserDir public_htmlAnd then simply uncomment the example provided, which will give you read access to the user files:
# UserDir disabled
<Directory /home/*/public_html>You'll now need to create a public_html directory for all users and make sure that permissions and SELinux are configured correctly. This is for a user called myuser.
AllowOverride FileInfo AuthConfig Limit
Options MultiViews Indexes SymLinksIfOwnerMatch IncludesNoExec
<Limit GET POST OPTIONS>
Order allow,deny
Allow from all
</Limit>
<LimitExcept GET POST OPTIONS>
Order deny,allow
Deny from all
</LimitExcept>
</Directory>
mkdir /home/myuser/public_html;chmod 701 /home/myuser; chmod 705 /home/myuser/public_htmlNow create a test page and give it the right permissions:
echo 'A Simple User Page' >> public_html/index.html; chmod 604 public_html/index.htmlFinally, set the SELinux settings to enable home directories:
setsebool -P httpd_enable_homedirs 1and change the user contexts to the Apache user context (you can get this command from the manual page for httpd_selinux):
chcon -R -t httpd_sys_content_t /home/myuser/public_htmlRestart Apache and you should be able to visit myuser's fancy page:
elinks 127.0.0.1/~myuserYou can create by public_html directory and even a simple page for all new users by modifying the skeleton directory, like so:
mkdir /etc/skel/public_htmlThis only helps for new users, but for existing users the process could be scripted like this:
echo 'A Simple User Page' >> public_html/index.html;
chmod -R 705 /etc/skel/public_html/
#!/bin/bash
if [ -n "$1" ]This script can be improved by looping through the accounts and checking that public_html does not exist, but it does the work.
then
user=$1
else
echo "Usage prepare username"
exit
fi
##Set appropriate permissions for home directory
chmod 701 /home/$user
##Create public_html
mkdir /home/$user/public_html
##Create Index.html file
echo "A Simple User Page for $user" >> /home/$user/public_html/index.html;
##Change permissions and ownership
chown -R $user:$user /home/$user/public_html
chmod -R 705 /home/$user/public_html/
##Change SELinux context
chcon -R -t httpd_sys_content_t /home/$user/public_html
NameVirtualHost *:80I now create the DocumentRoot directories:
<VirtualHost *:80>
ServerAdmin webmaster@dummy-host.example.com
DocumentRoot /var/www/rhel6virtual/
ServerName rhel6virtual.dev.com
ErrorLog logs/rhel6virtual
CustomLog logs/rhel6virtual common
</VirtualHost>
<VirtualHost *:80>
ServerAdmin webmaster@dummy-host.example.com
DocumentRoot /var/www/rhel6morevirtual
ServerName rhel6morevirtual.dev.com
ErrorLog logs/rhel6mv
CustomLog logs/rhel6mv common
</VirtualHost>
mkdir /var/www/rhel6virtual; mkdir /var/www/rhel6morevirtualand add a file to each directory to allow easy testing:
echo "More Virtual" > /var/www/rhel6morevirtual/index.html;
echo "Virtual" > /var/www/rhel6virtual/index.htmlYou can now restart Apache:
httpd -k restartSo now if you visit http://rhel6virtual.dev.com/index.html you'll see a web page that simply says Virtual and if you visit http://rhel6morevirtual.dev.com/index.html you'll see a web page that simply says More Virtual.
getsebool -a | grep httpdFor an explanation of what each settings does, check this manual page out:
man httpd_selinuxIn order to prevent access to the websites you can use iptables (don't forget to save the configuration), e.g.
iptables -I INPUT -p tcp --dport 80 -s 10.168.20.0/24 -j DROPor you can edit the configuration file for Apache, add the following to the second virtual host from above:
<Directory "/var/www/rhel6morevirtual/">Only 10.168.20.203 can see rhel6morevirtual now.
Options Indexes FollowSymLinks
AllowOverride None
Order deny,allow
Allow from 10.168.20.203
Deny from all
</Directory>
htpasswd -cm /etc/httpd/conf/apachepass myuserNow, edit the Apache config file and inside the directory directive for "/var/www/rhel6morevirtual/" add:
AuthType BasicRestart Apache and now the only user that can see rhel6morevirtual will be myuser.
AuthName "Restricted Files"
AuthUserFile /etc/httpd/conf/apachepass
Require user myuser
AuthType BasicYou now need to run:
AuthName "Restricted to myuser"
AuthUserFile /home/myuser/public_html/.htauthusers
Require valid-user
htpasswd -c .htauthusers myuserIf you try to visit the page, you'll be prompted for a username and password. The beauty of this method is that it allows users without root access to restrict access to "their" web site.
#$ModLoad imtcp.soso that they look like this
#$InputTCPServerRun 514
$ModLoad imtcp.soOpen the firewall and save the configuration change to the firewall:
$InputTCPServerRun 514
iptables -I INPUT -p tcp --dport 514 -j ACCEPT; service iptables saveAll that remains is to restart the logging daemon:
service rsyslog restartNote that you could use UDP instead or as well as TCP. The rsyslog manual is your friend.
*.* @@10.168.20.233:514The above assumes that you want to log everything to a server on 10.168.20.233 on port 514. It is of course possible to simply log a category, e.g. mail, cron, authentication, etc.. Use the next line to log authentication to the same server:
authpriv.* @@10.168.20.233:514All that remains is to restart the logging daemon:
service rsyslog restartYou can test that the system is logging to the remote server with:
logger "remote logger"Incidentally, the logger command is very good for adding logging to bash scripting, so be sure to remember it.
sar -AIn order to get processor utilization statistics use simply use (note that cpunumber is zero based, in other words the first cpu is 0) :
sarIn order to get memory usage statistics, use:
or
sar -P cpunumber
or
sar -u ALL
sar -rRTo get swap usage statistics, use:
sar -SArguably paging usage statistics are part of the memory, so:
sar -BYou can get disk usage statistics with:
sar -bFinally network usage statistics can be obtained with (note that there are over 15 different keyworks, e.g. ICMP, EICMP,TCP, ETCP etc, and you can normally add an E to the keyword to get the error statistics):
or
sar -d
or even
sar -dp
sar -n DEVUnfortunately, the manual page is very long and unwieldy, so it might be a good idea to remember some of these by heart for the exam.
and
sar -n EDEV
yum install scsi-target-utils -yStart the target daemon and set it to start on boot:
service tgtd start; chkconfig tgtd onYou can now add a target, using the tgtadm command. Oddly enough, the help command is actually extremely helpful, in that it essentially gives you examples rather than a list of what each flag does. Not that there is anything wrong with a list of what each flag does, but sometimes more examples would not go amiss, anyway, create the target with:
tgtadm --lld iscsi --mode target --op new --tid=1 --targetname iqn.3141.15.domain.com:testYou then need to add a LUN to this target and tell it what storage it should use:
tgtadm --lld iscsi --mode logicalunit --op new --tid=1 --lun=1 --backing-store=/dev/sdbAll that remains is to enable the target to accept initiators:
tgtadm --lld iscsi --mode target --op bind --tid=1 --initiator-address=ALLYou can check port 3260 with (thanks to this daniel miessler for this post):
lsof -i:3260If you don't see any output then something has gone wrong. You can list the targets with this command:
tgtadm --lld iscsi --op show --mode targetMake sure that you open port 3260 on your firewall and save it:
iptables -I INPUT -p tcp --dport 3260 -j ACCEPT; service iptables saveThat should be it, you now have an iSCSI target ready to be mounted. Note that this will allow anybody to mount your target, so it is really only good as a internal test.
yum groupinstall 'iSCSI Storage Client'Strangely, this group seems to consist solely of iscsi-initiator-utils. Anyway, start the iscsi service and set it to start on boot:
/etc/init.d/iscsi start; chkconfig iscsi onYou can now look for targets with this, where 10.168.20.233 is the ip address of the server hosting the iSCSI targets:
iscsiadm -m discovery -t sendtargets -p 10.168.20.233Restart the iscsi service:
service iscsi restartCheck that you see the new device with:
fdisk -lYou can now use the new disk to create partition(s) and file systems for those partition(s) and mount it (them).
UUID=54e1bd41-68d0-4804-94f8-1b255e53a88d /iscsi ext4 _netdev 0 0
yum install rpmdevtools -yYou now need to create the source tree, which you can do manually (You'll need BUILD,BUILDROOT, RPMS, SPECS,SOURCE,SRPMS) or you can just use:
rpmdev-setuptreeSince the objective calls for a least one file to be packaged, let's just create a script, say greetings.sh, and copy it to its own folder in the home/user/rpmbuild/SOURCES directory:
echo 'echo "hello `whoami`";' >> greetings.sh; chmod +x greetings.sh ; mkdir /home/user/rpmbuild/SOURCES/greet-1.0; cp greetings.sh /home/user/rpmbuild/SOURCES/greet-1.0Create a tarball out of the directory with the greetings.sh script, from SOURCES directory:
tar -czvf greet.tar.gz greet-1.0Now, you need a spec file and you can create a sample spec file with, again from SOURCES directory:
rpmdev-newspec ../SPECS/greet.specYou can now edit this file to this:
Name: greetYou can build this file with from the SPECS directory:
Version: 1.0
Release: 1%{?dist}
Summary: Greets the invoker
Group: Greetings Group
License: GPL
URL: http://www.sgniteerg.com
Source0: greet.tar.gz
BuildRoot: %{_tmppath}/%{name}-%{version}-%{release}-root-%(%{__id_u} -n)
%description
%prep
%setup -q
%build
%install
install -m 0755 -d $RPM_BUILD_ROOT/opt/greet
install -m 0777 greetings.sh $RPM_BUILD_ROOT/opt/greet/greetings.sh
%clean
#rm -rf $RPM_BUILD_ROOT
%files
%dir /opt/greet
/opt/greet/greetings.sh
%defattr(-,root,root,-)
%doc
%changelog
rpmbuild -bb greet.specThis will create an rpm, greet-1.0-1.el6.x86_64.rpm, in the RPMS/x86_64 directory of your buildtree, which you can then proceed to install. If you are not using the x86_64 architecture, the directory will be different. You could add BuildArch: noarch to the spec file.

[logging]Unfortunately, this will not actually do much.
default = FILE:/var/log/krb5libs.log
kdc = FILE:/var/log/krb5kdc.log
admin_server = FILE:/var/log/kadmind.log
[libdefaults]
default_realm = DOMAIN.COM
dns_lookup_realm = false
dns_lookup_kdc = false
ticket_lifetime = 24h
renew_lifetime = 7d
forwardable = true
[realms]
DOMAIN.COM = {
kdc = yetanother.domain.com
admin_server = yetanother.domain.com
}
[domain_realm]
.domain.com = DOMAIN.COM
domain.com = DOMAIN.COM
kinitAs mentioned above you need a user principal in order to get a ticket and a user to be able to do anything useful. Let's say that you have openLDAP configured (have a look at this post if in doubt) and you have a user account called crap in that domain. Assuming that a principal for crap exists and you know the password you can just do:
kinit: Client not found in Kerberos database while getting initial credentials
kinit crapand provided that you typed the right password, you'll get a ticket, check with:
klist
Ticket cache: FILE:/tmp/krb5cc_0Have a look at my previous post to configure openSSH to work with Kerberos.
Default principal: crap@DOMAIN.COM
Valid starting Expires Service principal
06/17/11 11:59:53 06/18/11 11:59:53 krbtgt/DOMAIN.COM@DOMAIN.COM
renew until 06/17/11 11:59:53
ipaddress fqdn hostname
GSSAPIAuthentication yes
GSSAPICleanupCredentials yes
Host *.domain.com
GSSAPIAuthentication yes
GSSAPIDelegateCredentials yes
sysctl -aIn order to change a setting temporarily:
sysctl net.ipv4.ip_forward=1In order to make the changes permanent you need to edit the /etc/sysctl.conf file. Simply add the value you want, e.g. net.ipv4.ip_forward=1, save it and then issue the following command:
or
echo 1 > /proc/sys/net/ipv4/ip_forward
sysctl -p
sysctl -pYou can check that the changes have taken place with:
sysctl net.ipv4.ip_forwardYour server is ready, you just need to make sure that the default gateway is set to this server in the clients, see my previous post for details on how to do this.
iptables -I INPUT -p tcp --dport 80 -s 10.168.20.225 -j REJECTYou can block a whole network, just change the -s parameter to say, 10.168.20.0/24. You can use a similar rule to allow access from particular ip addresses or networks (make sure that there are no spaces between the ip addresses or networks) :
iptables -I INPUT -p tcp --dport 80 -s 10.168.20.225,10.168.20.226 -j ACCEPTSimilarly, you could create a single rule for several services (say http, https):
iptables -I INPUT -p tcp -m multiport --dports 80,443 -j ACCEPTAs you can imagine, this barely touches the surface of what iptables can do, but it gives you an idea.
1. echo "10.10.11.0/24 via 10.168.20.227 dev eth0" >> /etc/sysconfig/network-scripts/route-eth0
2. echo "10.10.11.0/24 dev eth0" >> /etc/sysconfig/network-scripts/route-eth0You can activate the routes with the following command:
/etc/sysconfig/network-scripts/ifup-routes eth0The first way will provide a route to the 10.10.11.0 network and set 10.168.20.227 as the gateway for that route, in other words, it expects 10.168.20.227 to be able to route those packages to the 10.10.11.0 network (or at least to forward them to a server/router that can), you can check the routing table in a myriad of ways, for instance (only showing relevant line):
netstat -nr
Kernel IP routing tableThe second way will provide a similar route to the 10.10.11.0, but will not set a gateway for that route. So that instead of sending the packages to the gateway, it will simply send them directly to the 10.10.11.0 network.
Destination Gateway Genmask Flags MSS Window irtt Iface
10.10.11.0 10.168.20.227 255.255.255. 0 UG 0 0 0 eth0
route -n
Kernel IP routing tableFor completeness, the commands needed to achieve the same as above are the following:
Destination Gateway Genmask Flags Metric Ref Use Iface
10.10.11.0 0.0.0.0 255.255.255.0 U 0 0 0 eth0
route add -net 10.10.11.0 netmask 255.255.255.0 gw 10.168.20.227 eth0Note, that a reboot will clear these from the routing table, so you should use them only for testing before writing them to the interface route file.
route add -net 10.10.11.0 netmask 255.255.255.0 eth0
yum install policycoreutils-pythonTo illustrate how to use this, set SELinux to enforcing:
setenforce 1Save your iptables configuration to a file:
iptables-save >myiptables.txtThis file is empty, so check the audit log and you'll see the following message:
type=AVC msg=audit(1307819809.595:16342): avc: denied { write } for pid=22969 comm="iptables-save" path="/root/mytables.txt" dev=sda3 ino=144189 scontext=unconfined_u:unconfined_r:iptables_t:s0-s0:c0.c1023 tcontext=unconfined_u:object_r:admin_home_t:s0 tclass=fileCopy this line to a file, say iptables.audit and run:
audit2why < iptables.auditYou'll get this ouput:
Was caused by:This confirms that the issue is with SELinux, so now let's resolve it:
Missing type enforcement (TE) allow rule.
You can use audit2allow to generate a loadable module to allow this access.
audit2allow -M iptables -i iptables.auditThis will create a module called iptables.pp, that can be installed with this command:
semodule -i iptables.ppNow you can safely save your iptables configuration.
getsebool -aSince SELinux settings don't really have catchy names, your best bet is using grep in conjunction with the -a switch, e.g to find all SELinux settings related to ssh:
getsebool -a | grep sshYou can now use the setsebool command to change the settings like this:
setsebool -P selinuxsetting booleanwhere boolean is 1 to switch on and 0 to switch off.
[root@centos1 examples]# getsebool -a | grep virt_use_nfs
virt_use_nfs --> off
[root@centos1 examples]# togglesebool virt_use_nfs
virt_use_nfs: active
[root@centos1 examples]# getsebool -a | grep virt_use_nfs
virt_use_nfs --> on
restorecon -vv filename
ls -lZand to list processes' context:
ps -AZ
getenforceYou can also look at /etc/selinux/config, which will tell you the status at boot time. This does not necessarily mean that it is the current SELinux status, because you can switch it off on the fly by issuing the following command:
echo 0 >/selinux/enforceor this command:
setenforce 0Similarly, you can switch it back on with:
echo 1 >/selinux/enforceor this command:
setenforce 1Let's get back on track and look at the objective. You'll need to set the appropriate value for this line in the /etc/selinux/config file. So for enforcing mode, you'll have:
SELINUX=enforcingand for permissive you'll have:
SELINUX=permissiveIn development/test permissive mode should be used, so that you can diagnose and fix failures, in production you should use enforcing.


iptables -Fthis will clear your iptables configuration, which will allow any traffic through, you can check that the firewall rules are empty with this command:
iptables -nvLNow, let's block all traffic:
iptables -I INPUT -j DROPNeedeless to say that you should not perform this command remotely, as it will block your remote connection. You can use REJECT instead of DROP, where the former replies to client and the latter doesn't, check the iptables manual for longer and better explanation.
iptables -I INPUT -p tcp --dport ssh -j ACCEPTNote, that if you use -I iptables will insert the line to the top of the chain, if you want to add it to the bottom of the chain you can use -A instead.
Active Internet connections (servers and established)You can see that the local server (10.168.20.221) is listening to any address on port 22 and you can also see that a connection has been established to the local server on port 22 from 10.168.20.227 on port 34492. The line below shows the opposite, a connection has been established from port 44334 on the local server to 10.168.20.225 on port 22. This is essentially how network sockets work, the service listens on a pre-established port, 22 in this case, and the actual connection takes place in one of the ephemeral ports, remember that each connection needs a socket, so that if you connected to port 22, then nobody else would be able to connect to that socket and thus no more connections to the server, not very useful, right? So what can you do, just add a rule like this:
Proto Recv-Q Send-Q Local Address Foreign Address State
tcp 0 0 0.0.0.0:22 0.0.0.0:* LISTEN
tcp 0 0 10.168.20.221:22 10.168.20.227:34492 ESTABLISHED
tcp 0 0 10.168.20.221:44334 10.168.20.225:22 ESTABLISHED
iptables -I INPUT -p tcp -m state --state RELATED,ESTABLISHED -j ACCEPTNote that in order for a connection to be established in needs to be initiated from the client and thus should not present any risks if your server has not been compromised.
iptables -I INPUT -i eth0 -p tcp --sport 22 -m state --state RELATED,ESTABLISHED -j ACCEPTRemember that you need to save the rules as otherwise they will be lost after a reboot, a new way of saving them not discussed before:
service iptables saveI have already provided examples of rules for web and ftp servers in previous posts. A couple more commands to finish, the first one is how to delete rules.
iptables -D chainname rulenumberand the second one is how to zero the counters, this can be helpful with troubleshooting sometimes:
iptables -Z chainname
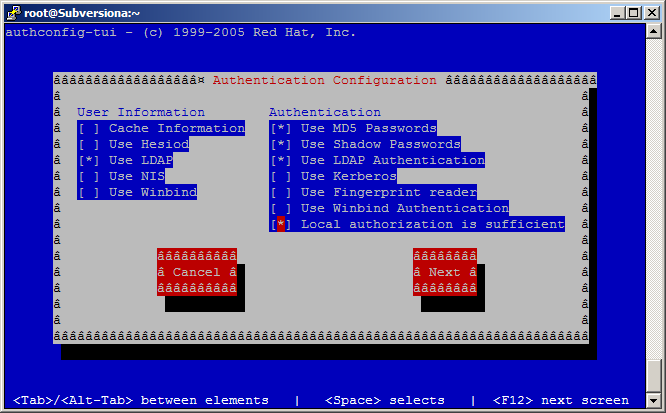
yum install openldap{,-clients,-devel,}Now run the authconfig-tui tool:

passwd: files sssYou need to change the above three lines to:
shadow: files sss
group: files sss
passwd: files ldapYou can now (re)start nslcd, needless to say that you should make sure that the services (sssd, nslcd) will run after a reboot (e.g. chkconfig nslcd on).
shadow: files ldap
group: files ldap
getent passwdYou can check the domain users with this command to compare them with the output of the command above:
ldapsearch -xb "dc=domain,dc=com" "objectclass=account"I must say that this objective seems a little bit more complicated than the average objective. I might give authconfig a try to see if it is less fiddly.
groupadd groupnameDelete group:
groupdel groupnameModify groups and group memberships:
groupmod -n newgroupname oldgroupnameor change the group id :
groupmod -g 1234 groupnameGroup memberships can be changed with the groupmems command. To add users to a group issue the following command:
groupmems -g groupname -a usernameand to delete them from the group:
groupmems -g groupname -d usernameYou can purge a group with the -p switch and the -l switch will list the users belonging to that group, e.g.:
groupmems -g groupname -lThe group file is in /etc/group, but you could also list its contents with the getent command:
getent groupThis commands works for users (passwd or shadow), hosts and a few others, as detailed in the man page.
passwd usernameAs with most commands there are plenty of options, but the above command will prompt you to enter a new password for the account username.
passwd -x 30 usernameThis can, sort of, also be achieved, with chage:
chage -E 'Jul 11, 2011' usernameThis command will actually disable the account in 30 days, so perhaps it is not quite what the objective calls for, but interesting to know nonetheless.
passwd -S usernameYou can also get relevant information regarding account aging with:
chage -l username
useradd usernameYou can check that a new group has also been created:
getent group | grep usernameAlternatively, you can assign the user to an already existing group:
useradd -g groupname usernameThere are quite a number of options when creating users, so have a look at them.
userdel -r usernameNote that this will remove the home directory and mail spool for the user, if you want the directory and mail spool to remain, just user:
userdel usernameModify user accounts:
usermod -s /bin/sh usernameor make the user member of a couple of extra secondary groups:
usermod -aG groupname1,groupname2 usernameor change the username:
usermod -l newusername oldusername
# grub.conf generated by anacondaNote how this server has two kernels installed and therefore two entries in the grub.conf file.
#
# Note that you do not have to rerun grub after making changes to this file
# NOTICE: You have a /boot partition. This means that
# all kernel and initrd paths are relative to /boot/, eg.
# root (hd0,0)
# kernel /vmlinuz-version ro root=/dev/sda3
# initrd /initrd-[generic-]version.img
#boot=/dev/sda
default=0
timeout=5
splashimage=(hd0,0)/grub/splash.xpm.gz
hiddenmenu
title Red Hat Enterprise Linux Server (2.6.32-131.0.15.el6.x86_64)
root (hd0,0)
kernel /vmlinuz-2.6.32-131.0.15.el6.x86_64 ro root=UUID=e9b35e95-5634-4891-8854-e4053f3fb350 rd_NO_LUKS rd_NO_LVM rd_NO_MD rd_NO_DM LANG=en_US.UTF-8 SYSFONT=latarcyrheb-sun16 KEYBOARDTYPE=pc KEYTABLE=uk crashkernel=auto rhgb quiet
initrd /initramfs-2.6.32-131.0.15.el6.x86_64.img
title Red Hat Enterprise Linux (2.6.32-71.el6.x86_64)
root (hd0,0)
kernel /vmlinuz-2.6.32-71.el6.x86_64 ro root=UUID=e9b35e95-5634-4891-8854-e4053f3fb350 rd_NO_LUKS rd_NO_LVM rd_NO_MD rd_NO_DM LANG=en_US.UTF-8 SYSFONT=latarcyrheb-sun16 KEYBOARDTYPE=pc KEYTABLE=uk crashkernel=auto rhgb quiet
initrd /initramfs-2.6.32-71.el6.x86_64.img
cp /boot/grub/grub.conf grub.conf.bk
yum update kernelIf your system is not connected to a repository, you can update the kernel by downloading the kernel rpm(s) and installing it like this:
yum update kernel-2.6.32-131.0.15.el6.x86_64.rpm kernel-firmware-2.6.32-131.0.15.el6.noarch.rpmYou could also compile a new kernel, but that is beyond the objectives here I think.
default=0Note how the new kernel is the new default kernel. After a reboot, you can check that the new kernel is running:
timeout=5
splashimage=(hd0,0)/grub/splash.xpm.gz
hiddenmenu
title Red Hat Enterprise Linux Server (2.6.32-131.0.15.el6.x86_64)
root (hd0,0)
kernel /vmlinuz-2.6.32-131.0.15.el6.x86_64 ro root=UUID=e9b35e95-5634-4891-8854-e4053f3fb350 rd_NO_LUKS rd_NO_LVM rd_NO_MD rd_NO_DM LANG=en_US.UTF-8 SYSFONT=latarcyrheb-sun16 KEYBOARDTYPE=pc KEYTABLE=uk crashkernel=auto rhgb quiet
initrd /initramfs-2.6.32-131.0.15.el6.x86_64.img
title Red Hat Enterprise Linux (2.6.32-71.el6.x86_64)
root (hd0,0)
kernel /vmlinuz-2.6.32-71.el6.x86_64 ro root=UUID=e9b35e95-5634-4891-8854-e4053f3fb350 rd_NO_LUKS rd_NO_LVM rd_NO_MD rd_NO_DM LANG=en_US.UTF-8 SYSFONT=latarcyrheb-sun16 KEYBOARDTYPE=pc KEYTABLE=uk crashkernel=auto rhgb quiet
initrd /initramfs-2.6.32-71.el6.x86_64.img
uname -r
2.6.32-131.0.15.el6.x86_64
rpm -ivh mypackage.rpmInstall and update software packages from a remote repository:
rpm -Uvh mypackage.rpm
[nfs]The baseurl field can be an http://, ftp:// or file:// URL.
name=nfs
baseurl=file:///distro/
enabled=1
rpm --import gpgkeyNow you are ready to use yum, which handles dependencies as well and thus is really useful, in their simpler forms, the command are very similar to rpm.
yum install packageInstall and update software packages from Red Hat Network:
yum upgrade package
yum install vsftpd ftpNow, you can switch it on with
service vsftpd startSince you presumably want the ftp server to be running automatically at boot, you need to do the following:
chkconfig vsftpd onThat's it, you now have a vsFTP running and configured to start at boot. You just need to allow traffic to it, so open the firewall for port 21 and save it:
iptables -I INPUT -p tcp --dport ftp -j ACCEPT; iptables-save > /etc/sysconfig/iptablesYou can check this by using the ftp client to connect anonymously to your ftp server, e.g.
ftp 127.0.0.1
Connected to 127.0.0.1 (127.0.0.1).Make sure that the username is anonymous. You don't need to enter a password, just hit enter.
220 (vsFTPd 2.2.2)
Name (127.0.0.1:root): anonymous
331 Please specify the password.
Password:
230 Login successful.
Remote system type is UNIX.
Using binary mode to transfer files.
ftp> ls
227 Entering Passive Mode (127,0,0,1,143,26).
150 Here comes the directory listing.
drwxr-xr-x 2 0 0 4096 May 26 2010 pub
226 Directory send OK.
yum install httpdNow, you can switch it on with
service httpd startSince you presumably want the web server to be running automatically at boot, you need to do the following:
chkconfig httpd onThat's it, you now have a apache running and configured to start at boot. You just need to allow traffic to it, so open the firewall for port 80 and save it:
iptables -I INPUT -p tcp --dport http -j ACCEPT; iptables-save > /etc/sysconfig/iptablesYou can check this by using a browser to navigate to localhost, e.g.
elinks 127.0.0.1

echo "hello" > /var/www/html/index.htmlif we try elinks again:
elinks 127.0.0.1

abrtd 0:off 1:off 2:off 3:on 4:off 5:on 6:off
acpid 0:off 1:off 2:on 3:on 4:on 5:on 6:off
atd 0:off 1:off 2:off 3:on 4:on 5:on 6:off
.
You can also check a particular service with:.xinetd 0:off 1:off 2:on 3:on 4:on 5:on 6:off
ypbind 0:off 1:off 2:off 3:off 4:off 5:off 6:off
chkconfig --list servicenameIn order to set a service to start at boot for runlevels 3 & 5 you would use this:
chkconfig --level 35 servicename onIf you want to set the service to run on all runlevels, just issue this command:
chkconfig servicename onNote that this will not set the service to run for runlevels 0,1 and 6.
ntsyv

virsh autostart domainnamewhere domainname is the name of the virtual machine.
virsh autostart testvmwhich has the following result:
Domain testvm marked as autostarted
virt-install --promptThis should prompt you for every detail needed to create a new virtual machine.
virt-install -n test -r 1024 --vcpu=1 -l nfs:10.168.20.227:/distro --os-type='linux' --os-variant='rhel6' --network network:default --file=/var/lib/libvirt/images/test.img --file-size=6 -x console=ttyS0This will allow you to install Red Hat with a terminal user interface and will allow you to access the console of this machine from a terminal as discussed on here.


yum groupinstall "Virtualization"There are a further two package groups related to virtualization, Virtualization Tools and Virtualization Platform, I don't think they are really needed, as they install libguestfs, which is a library for accessing and modifying guest disk images and libvirt,which is a C toolkit to interact with the virtualization capabilities of recent versions of Linux (and other OSes).
yum groupinstall "Virtualization Client"


append initrd=initrd.img ks=http://myserver/myksfile.cfgChange directory to /iso and run the following command:
mkisofs -J -T -o ../ks.iso -b isolinux/isolinux.bin -c isolinux/boot.cat -no-emul-boot -boot-load-size 4 -boot-info-table -R -m TRANS.TBL .This will create an bootable iso called ks.iso in /. You can now use this iso to automate the deployment, without the need to provide a ks file location every time.
append initrd=initrd.img ks=cdrom:/ks.cfgThe advantages of using a network server (web, ftp, share) is that you can change the kickstart file without the need to burn a new CD, good if you are a cheapskate like me :)
id:3:initdefault:If you have installed RHEL graphically, your default runlevel will be 5. At any rate, all you need to do is to change the number to your desired run level. Please make sure you understand what services run in the run level you are setting as default. You might find yourself without an expected graphical interface or worse still, unable to access the system remotely.
who -r
crontab -eA few points about the time elements. In the day of the week field 0 and 7 mean Sunday and if you specify day of the week and day of the month, it will run at both specified times. If you want a task to be repeated every x number of minutes, simply have the first time element set as */x, e.g. to run myscript.sh as user myuser every 5 minutes, the following line would be needed (assuming that you are either logged in as myuser or that you have invoked : crontab -u myuser -e to access myuser's crontab file)
*/5 * * * * myscript.shYou could also set intervals, e.g this will run myscript.sh every 5 minutes between 20 and 40 minutes past the hour
20-40/5 * * * * myscript.shIf running the jobs from /etc/crontab then you do need to specify the user, normally root I would guess.
If cron.allow file exists, then you must be listed therein in order to be allowed to use this command. If the cron.allow file does not exist but the cron.deny file does exist, then you must not be listed in the cron.deny file in order to use this command. If neither of these files exists, only the super user will be allowed to use this command.For completeness, a user can list their cron tasks using crontab -l and delete with crontab -r or you could just visit this link, which I only found when looking for info regarding cron.allow, blast.
search dev.com sams.orgThe file /etc/host.conf controls how name resolution is configured, see default below:
nameserver 10.168.20.1
multi onThe first entry means that all valid addresses on /etc/hosts will be returned for a host whereas the second entry specifies that name resolution should first attempt to look at the hosts file and then at the name server specfied in resolv.conf.
order hosts,bind
NETWORKING=yesIf you need to change the hostname, this is where you need to start. The easiest way is to change the name here and reboot, as otherwise you will need to go through all places in the system where the hostname needs to be changed.
HOSTNAME=Subversion
DEVICE="eth0"The lines in bold are the lines you are interested on, nothing much to say here really.
BOOTPROTO="static"
DNS1="10.168.20.1"
HOSTNAME="Subversion"
HWADDR="00:50:56:88:18:A4"
IPADDR="10.168.20.228"
MTU="1500"
NETMASK="255.0.0.0"
NM_CONTROLLED="yes"
ONBOOT="yes"
DEVICE="eth1"Needless to say that you need a dhcp server for the latter to work. The MAC Address is not necessary.
BOOTPROTO="dhcp"
HWADDR="00:50:56:88:72:2B"
ONBOOT="yes"
service network restartIn practice, you really only want to restart the interface that you have changed so you should do:
ifdown eth1
ifup eth1
The first simply lists all the files in a directory and should be your first port of call when you get a permission denied error. Like below, where I'm trying to change to the /root/ directory logged in as user noroot.
- ls -l directorypath
- getfacl filename
[noroot@Subversion /]$ cd /root/If you have enabled ACLs for the file system, then the issue might be related to the acl, so you could have a look with the second command.
bash: cd: /root/: Permission denied
10:168.20.225:/inst /distro nfs defaults 0 0This will mount the nfs share /inst on 10.168.20.225 to a directory called /distro, with default options.
\\10.168.20.112\c$ /test cifs cred=/cred.cifs 0 0This will mount the c drive of 10.168.20.112 to /test. The cred.cifs file contains the credentials needed to mount the share. This file needs to have the following format:
username=valueOf course, you could simply pass the credentials as options instead of a credentials file. Ensure that the file /cred.cifs is only readable by the appropriate user(s).
password=value
domain=value
(&(objectCategory=person)(objectClass=user)(lockoutTime>=1))Step by step then:


